

Nvidia Shadowplay, also known as Nvidia share, is a tool that lets gamers with Nvidia graphics cards record and stream your gameplay live. It’s also an in-game overlay that lets you take screenshots or check your frames per second (fps). Many users of Nvidia cards have access to this feature, but do you know how to enable Nvidia Shadowplay to record your gameplay?
In this guide, we will show you step-by-step how to use Nvidia Shadowplay. We will also cover everything else you need to know about the program.
Before we get started, Nvidia has rebranded Shadowplay to Nvidia Share, we will be using these terms interchangeably throughout this guide. Nvidia Shadowplay continues to be the better-known name of the feature, but ultimately, both Shadowplay and Share are essentially the same program.
How to use Nvidia Shadowplay to record your gameplay
Nvidia Share can be accessed only through GeForce Experience. This is Nvidia’s software that is responsible for, amongst other things, helping you download and install drivers, optimize game settings, and more.
Step 1: Launch Nvidia Share by pressing the keyboard shortcut Alt + Z.
If you can’t get it to open, you may not have installed GeForce Experience. You can download it directly from Nvidia’s website.
Step 2: Directly below the toggle for the in-game overlay, select Settings to tinker with a few options before you start recording.

Step 3: The two crucial settings that you absolutely should adjust before recording are Privacy Control and Recordings:
Scroll all the way down in Settings until you find Privacy Control, then enable Desktop Capture. Without this, you won’t be able to record at all.
In Recordings, you can select the folder in which your video recordings will end up. Make sure you check it out prior to recording, especially if you have limited space on one of your drives.

Step 4: Other settings worth considering include:
- Keyboard shortcuts: Adjust the shortcut used to bring up Nvidia Shadowplay during gameplay, as well as other handy key bindings.
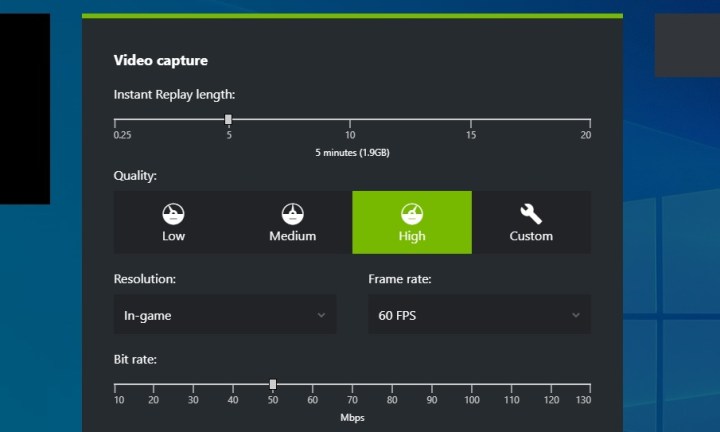
- Video capture: In this section, you can set the video quality, resolution, fps, and length of the Instant Replay feature. If you’re not sure what Instant Replay is, check out our section on it below.
- Audio: This section lets you separate and mute certain audio tracks. It’s useful if you’ll be playing a game while also using voice communication.
Click around and change the settings that are important to you. If you find you can’t change any, you may have Instant Replay turned on. Disable it first, then try to adjust your settings again (don’t forget to turn Instant Replay back on if you want it).
Step 5: Now it’s time to actually record some gameplay. Open up the game you want to record. You can then open up Shadowplay again by pressing the Alt + Z shortcut, or by selecting the small overlay icon in the corner. Selecting Share will open the in-game overlay. This overlay can be launched at any time, even if you’re not currently gaming.

Step 6: Before you begin recording, decide whether you also want to record your webcam and your microphone. You can adjust this in the Nvidia Shadowplay overlay, on the right side of the interface. Select the Webcam and Microphone icons to toggle them on or off.
When you’re ready to start recording, you can press Record directly in Nvidia Shadowplay, followed by Start, or via the default keyboard shortcut of Alt + F9. The same shortcut is used to stop recording when you’re done. Alternatively, you can bring the Shadowplay interface back up with Alt + Z and then stop recording manually.
Step 7: The recording will be saved to the folder you chose when setting up your Nvidia Share. By default, recordings can be found in C: > Users > YourName > Videos.
Congratulations! You’ve just recorded your first video with Nvidia Shadowplay. However, there is much more that this program is capable of, so keep reading below to find out what else you can use it for.
How to use Instant Replay in Nvidia Shadowplay
Instant Replay is a unique feature offered by Nvidia Share. When enabled, it constantly runs in the background and records your gameplay during the entirety of your gaming session. Instant Replay can save up to 20 minutes of gameplay without you ever needing to press the record button.
This means that all your spontaneous-yet-shareable moments get saved on your computer, and then if you don’t decide to keep them, they are overwritten as you play. Due to the 20-minute limit, the stored videos do not take up too much storage space.
Step 1: Open GeForce Experience and click the Share icon in the top-right corner, or bring up the overlay with the Nvidia Shadowplay hotkey of Alt + Z.
Step 2: In the in-game overlay, select Instant Replay, then select Settings.
Step 3: Adjust the maximum length of time that you want Shadowplay to record for, as well as various video settings. Select Save when you’re done.

Step 4: When you’re ready to let Instant Replay start recording, select it in the overlay and then select Turn On.
From that point on, Instant Replay will save your gameplay whenever you’re playing. If something interesting happens and you want it to be preserved instead of overwritten, pull up the Nvidia Shadowplay in-game overlay and press Save. Alternatively, use the default keyboard shortcut: Alt + F10.
Once saved, the videos will end up in the same folder you chose when setting up Nvidia Share.

How to broadcast live in Nvidia Shadowplay
Aside from recording your games, you can also use Nvidia Share to stream them live on various platforms. Nvidia currently supports direct streaming to Twitch, Facebook, and YouTube. While you will need to adjust a few settings before you get started, the streaming itself is easy.
Step 1: Open GeForce Experience with Alt + Z to enter Nvidia Share. In the overlay, select Broadcast Live, and then Settings. You will be presented with various settings that are exclusive to this section of Shadowplay.
Step 2: Pick which platform you are going to stream on, then select the video quality, resolution, frame rate, and bit rate.
Step 3: Pick custom overlays, such as something to cover your in-game chat.
Step 4: Check whether the ingest server is correct for your current location.
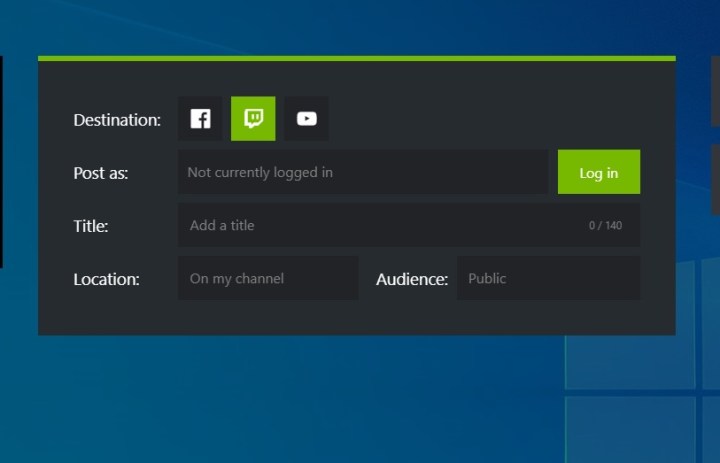
Step 5: When you are ready to start streaming, go back to the Nvidia Shadowplay overlay, select Broadcast Live, and then Start. This will produce a smaller window with a few options for you to fill out.
- Choose the platform you’ll be streaming on.
- Log on to your platform of choice via the overlay.
- Name your video using up to a maximum of 140 characters.
- Pick the location of the stream as well as the audience you’ll be streaming to.
When you’re done setting up, simply press Broadcast in order to start streaming or use the Alt + F8 keyboard shortcut. Stop streaming the exact same way.
How to take screenshots in Nvidia Shadowplay
The screenshot features in Nvidia Shadowplay are quite fun and super-quick to use. It’s a great alternative to all the other ways you can take a screenshot in Windows.
Step 1: Open the GeForce Experience app by pressing Alt + Z on your keyboard.
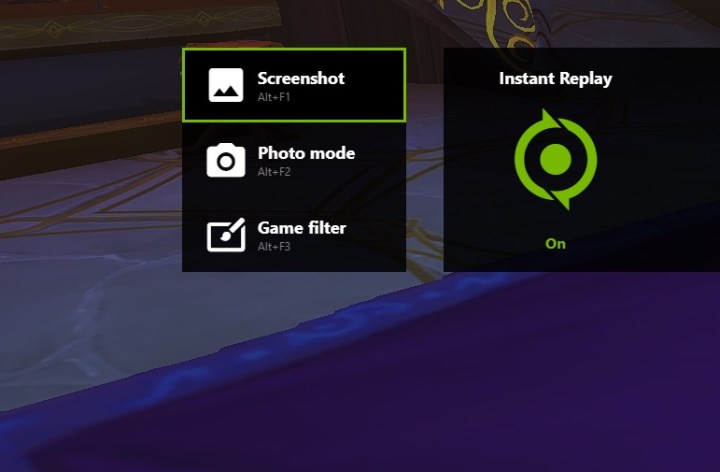
Step 2: On the far-left side of the overlay, you will find three different options:
- Screenshot: Exactly what it says on the label. You can also use Alt + F1 to take screenshots without pulling up the overlay.
- Photo mode: Access this using Alt + F2. In this section, Nvidia has a lot of neat features that can help you alter your screenshots before you take them. Feel free to play with filters, including artificial sharpening and various color modes.
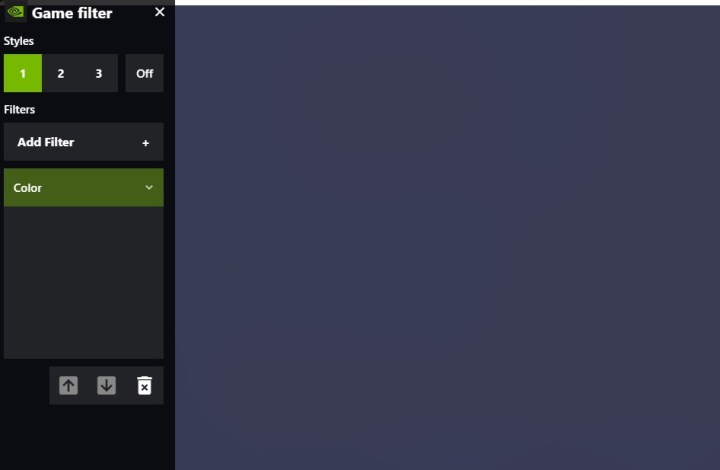
- Game filter: This feature lets you add a filter to your game. It’s basically a constant overlay that changes the way your game looks during your gameplay. It’s useful if you’re colorblind or your eyes get tired, but it may have some impact on your gaming performance.
How to use Nvidia Shadowplay for performance monitoring
Another fun option in Nvidia Shadowplay is called Performance Monitoring. In this section of GeForce Experience, you can access a live summary of your graphics card’s performance. Readily-available information includes the GPU clock, temperature, voltage, utilization, power consumption, fan speeds, memory clock, and even CPU utilization.
Step 1: In order to access this feature, simply open up the Shadowplay overlay by using the Alt + Z keyboard shortcut. The option to view performance metrics is found on the far right side of the overlay.
Step 2: If you have a recent Nvidia GPU, like an RTX 40-series GPU (at least GTX 16-series and newer), you will also have access to a section called Performance Tuning, located right below the monitoring section. If you’d like to use it, you will first have to turn off Instant Replay in the overlay.
You can try out Automatic Performance Tuning to optimize your graphics card without delving into any particular settings. This will cause GeForce Experience to check each setting for you and find ways to improve your card’s performance.
Before you try out the Automatic Performance Tuning, make sure your drivers are up to date and close all other programs, or the feature may not work.
Nvidia Shadowplay FAQ
Does Nvidia Shadowplay affect fps?
Nvidia Shadowplay comes with a host of fun, easy-to-use, gamer-oriented features. It’s definitely a great tool and a welcome addition from Nvidia. However, there is no denying that it will affect your fps to some degree.
Using Instant Replay, Record, and Broadcast Live is very likely to lower your frame rates. Your gaming performance may be affected just a little or a whole lot — this depends on your graphics card.
If you want to avoid having low frame rates, keep Instant Replay turned off and only record when you really want to.
Is Nvidia Shadowplay free to use?
Nvidia Shadowplay is free for all users who own one of Nvidia’s graphics cards. Not all cards are supported by this feature, but it’s accessible enough that most GPU owners will be able to use it. There are no extra subscription costs required: All you need is to download the free GeForce Experience program to get started.
Which graphics cards can use Nvidia Shadowplay?
There are a few system requirements that users must meet in order to run Nvidia Shadowplay. Shadowplay is mostly available to the owners of the best graphics cards released by Nvidia, although there is a fair amount of older models that also support this feature.
You can use Nvidia Shadowplay if your system meets the following requirements:
- Desktop: You own an Nvidia GeForce GPU newer than the GTX 900M, including GTX 16, 10, 900, 800, 700, 600, and 900M, or one of Nvidia’s RTX cards, including 30-series and 20-series units.
- Laptop: You must have at least an Nvidia GTX 850M, 860M, 950M, or 960M series card or higher.
You can find the full list of requirements on Nvidia’s website.
Editors’ Recommendations

